PROPERTIES
Background Theory
A property in ISIS is basically the assignment of a value to a named variable where you can create your own variables and then apply values to them on a component basis. In it's simplest form it amounts to:
<variable> = <value>
and an example would be
SUPPLIER = Digikey
Each property also has an associated description, allowing the variable to be abbreviated into something sensible. For example the property :
MoQ = 50
might have a description such as 'Minimum Order Quantity' and you would then see the following in the Edit Component dialogue form:
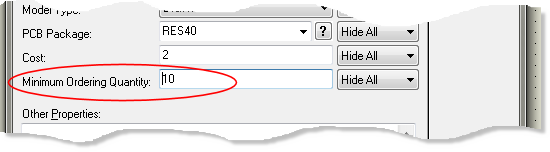
The idea is that you add information about the components in the design as properties and then include the properties as fields in the Bill of Materials report. The Property Editor in the Bill of Materials module provides an easy user interface for this process.
The Property Editor
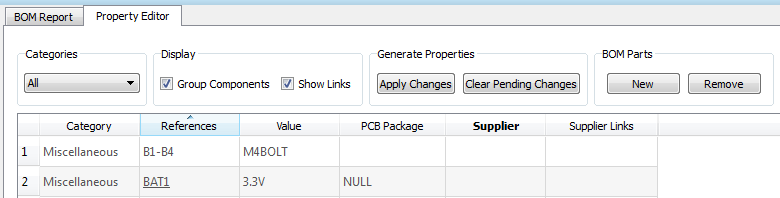
The Property Editor in the Bill of Materials shows a grid of components in the schematic (rows) and properties/fields in the BOM (columns). You can assign values to any user created property here, can add and create new properties and can then apply all this data back to the schematic. All of the information entered here will be applied to the HTML View and also to your final BOM report.
Basic operation will be self-evident to many users but we encourage everyone to refer to the practical examples linked below.
Note that properties added and changes made are reflected on the current schematic. If you want them to then be preserved for other designs you need to put them in a library. The easiest way to do this is simply to run the Compile to Library command on the Library Menu in ISIS which will save all current parts in the schematic to a (writable) library of your choice.
See Also:
Examples: Adding Properties and Entering Data
System Properties and User Properties
Proteus reserves some properties for internal use and these are known as system properties. Most of these properties are not relevant to the Bill of Materials but some are. For example, the property PACKAGE is used to identify the footprint associated with a component on the schematic.
A system property is read only in the Bill of Materials editor, although you can change the values of such properties through the Edit Component dialogue form.
Any property you create yourself is a user property and all user properties are editable via the Bill of Materials property editor. Examples of user properties include Cost, MoQ, RoHS, Supplier, Lead Time, Manufacturer and Notes.
See Also:
Example: Assigning values to Properties
BOM Parts
It is fairly common in a schematic for one schematic component to contribute more than one part to the Bill of Materials report. This is often used for fixtures and fittings such as fuseholders, fans, heatsinks or bolts. The following example illustrates how to add and remove bom parts from the report.
Lets assume that our schematic includes a transformer and we want to include four bolts in the BOM report. First, go to the property editor in the Bill of Materials module and select the New BOM Part button from the top.
The first task on the BOM Part Creator dialogue form is to identify the parent part. All BOM Parts need to 'belong' to a part on the schematic because the property system is component based. In our case we want to select the transformer as the parent part.
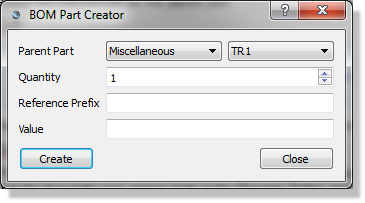
By default, the transformer will be in the Miscellaneous category because the reference prefix for the part ( 'TR' ) is not defined. If you wanted a Transformers category you simply add a category with the TR reference designator.
Next, specify the number of additional parts, the reference prefix for the new parts and the value (name).
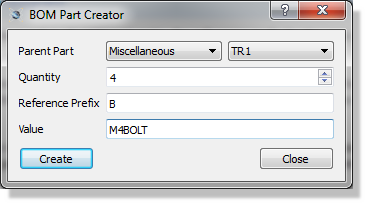
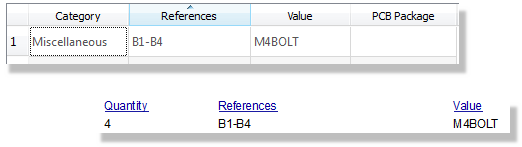
Press the create button to add the parts and then the close button to exit the dialogue form. You should see that the four bolts now appear both in the Property Editor and in the live view of the BOM report.
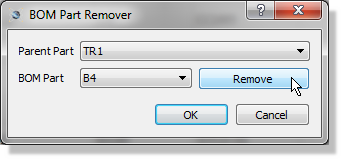
The process for removing BOM Parts is almost identical. Click on the remove button at the top of the property editor, filter by parent part to select the BOM part that you want to delete and then click the remove button.
See Also
Example: Adding parts for the BOM in a Component
Note (Advanced Use) :
Once you have created a BOM Part you will find that an extra field has been added at the bottom of the Edit Component dialogue form for that part. Deleting this string will remove the BOM Parts and editing the string will update the BOM report.
The format of the string is
BOMPART=QTY,REF,VALUE[,PROPNAME=PROPVAL,...]
The property name must begin with ‘BOMPART’ – thus ‘BOMPART’, ‘BOMPART1’, etc. are all valid property names.
The QTY parameter represents the quantity of parts to add. This will usually be ‘1’ but can be any number as appropriate.
The REF parameter represents the component reference prefix these new parts will be given. Note that if other parts exist in the report with the same prefix, the new parts will have prefixes that follow (numerically) from the last count used. Further, parts added in this way will still be grouped by category so if you want them to appear in a particular section of the report you will need to add a Category to handle this prefix.
The VALUE parameter is the ‘value’ that the new part should have. This is synonymous with the ‘name’ you want the part to have (e.g. FUSEHOLDER).
The PROPNAME=PROPVAL pairs are optional and allow you specify properties for the new components. For example, if your report contains a COST field to display the COST property of components, you might add ‘COST=0.11’.
Since the property syntax is quite tricky and it is easy to make mistakes we recommend that BOM Part creation and editing be done via the Property Editor dialogue forms.
Controlling BOM Contents from the Schematic
Fundamentally, information in the BOM report is taken from the schematic. Each component contributes a row in the report and each property can contribute to a column in the report.
Changing the value of a property - and therefore it's listing in the Bill of Materials - is normally done through the Bill of Materials property editor. However, it is equally valid to edit the schematic component and change the property value directly. This will automatically update the Bill of Materials with the change you have made.
For example, if a component has a property COST which is output in the BOM report then you could either:
- Use the property editor to change the value.
- Edit the schematic part for the component and change the value.

If you find that you do not want a part on the schematic to be present in the BOM report then you should create a new Variant. Assembly variants are created and managed from the Design Explorer module.
See Also:
Reference Manual : Assembly Variants
Example: Excluding a component from the BOM report
Bom Links
For many users, it is useful to hyperlink items in the BOM onto a webpage. This could be a PDF detailing operation of an IC, a suppliers website or even a direct link to a part purchase. Since the links are active both in the BOM Report view and also in the generated PDF output this is a useful way to add information or help with the purchasing procedure.
Links are enabled via the Edit Field dialogue form and can therefore be turned on or off for each column of the BOM Report.
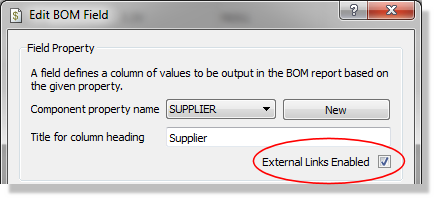
Links are shown via the Show Links button at the top of the Property Editor.

Once visible, links are edited in the same way as other properties.
While useful, the application of links to parts can be a little time consuming to set up. We recommend that you save the parts back into your Library after doing this so that the links, along with any other entered properties, are stored for future use. You can do this individually via Make Device or en-masse via the compile to library command on the Library Menu in ISIS.
See Also
Example: To add a link to the suppliers website
Example: To add a purchase link to a stockcode